Difference between revisions of "Debug OXP"
Cholmondely (talk | contribs) (→Links: Added another) |
Cholmondely (talk | contribs) (→Links: Added another) |
||
| Line 148: | Line 148: | ||
* [http://www.aegidian.org/bb/viewtopic.php?f=4&t=20512 Debug Console] for Python and Windows (CAG 2020) |
* [http://www.aegidian.org/bb/viewtopic.php?f=4&t=20512 Debug Console] for Python and Windows (CAG 2020) |
||
* [http://www.aegidian.org/bb/viewtopic.php?f=4&t=17731 Some Tips] on using the Debug Console (2015) |
* [http://www.aegidian.org/bb/viewtopic.php?f=4&t=17731 Some Tips] on using the Debug Console (2015) |
||
| + | *[http://aegidian.org/bb/viewtopic.php?f=9&t=12779 Handy tip for starting the Debug Console in Linux] (2012) |
||
{{misc-OXP}} |
{{misc-OXP}} |
||
Revision as of 19:17, 8 December 2021
Debug.oxp is a special OXP that enables JavaScript console support in Oolite (1.70 and later). It also adds a menu with various debug facilities under Mac OS X.
Contents
Downloads
Basic-Debug OXZ for Oolite v1.83/84
External JavaScript console support
On all platforms, installing Debug.oxp enables support for external console applications using the Oolite debug console TCP protocol. By default, it will attempt to connect to a console running on the same computer, but this can be changed by specifying a different console-host (and, optionally, console-port) in debugConfig.plist. For external console support on the same computer under Mac OS X, console-host must be explicitly set to “127.0.0.1”; if this is not done, the integrated JavaScript console will be used instead. For information on using a console (integrated or external), see Using the JavaScript console below.
Note: A cross-platform, python based, external console application is available in the Oolite GitHub project area.
It contains a precompiled console for windows based computers, and the original python based console for Linux and Posix compliant computers.
On Debian or Ubuntu Linux you will need python 2.6.x installed and (at least) the packages blt python-tk tk8.5 (or the equivalents in other distros.)
Mac OS X-specific features
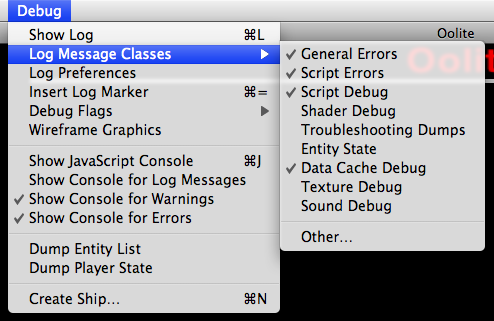
Under Mac OS X, the Debug OXP provides a menu with various debugging options and an integrated JavaScript console, as well as enabling external console support as on all platforms. This was originally written by Jens Ayton/Ahruman for version 1.69 (TR) back in 2007. To use this you need the Debug OXP in your AddOns folder and the Test Release version of Oolite.
The Debug menu provides options to
- Show the Oolite run log in the standard Console application.
- Enable or disable various classes of log message at runtime (like editing logcontrol.plist, without the need to restart Oolite).
- Enable various testing features, such as drawing of bounding boxes.
- Show the JavaScript console, and specify when it should be shown automatically. (This may not have any effect with external consoles, depending on the external console implementation.)
- Create a ship of any role near the main station (equivalent to the
:spawnmacro).
Note: some of these features are implemented by sending JavaScript messages to the console script. If the script has been modified, some features may not work properly.
The Log Message Classes submenu can be modified by editing debugLogMessageClassesMenu.plist, found inside the OXP. This is merged from Config directories in the usual fashion.
Integrated JavaScript console (Mac OS X only)
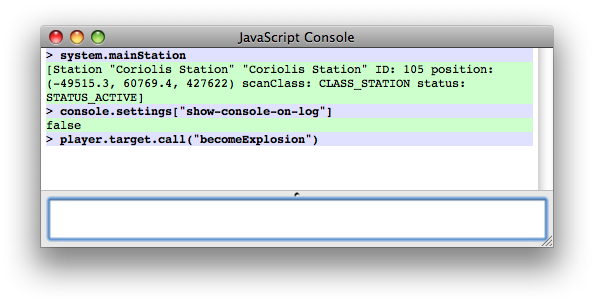
The integrated JavaScript console provides a window within Oolite which acts as a JavaScript console. It can be shown using the Show JavaScript Console command in the Debug menu, unless external console mode has been enabled by setting console-host in debugConfig.plist.
The integrated console has a 100-line memory. To see previous commands, press ⇞ (Page Up) or ⌥↑ (Option-Up Arrow). You can go the other way in the obvious manner.
Using the JavaScript console
The JavaScript console, whether integrated or external, provides a powerful mechanism for interactively manipulating the game world. It can be used to issue simple commands, like player.ship.awardEquipment("EQ_FUEL_INJECTION"). It can be used to inspect properties of entities in the game world. And it can be used to develop scripts, by rewriting and testing methods of live ship scripts and world scripts.
Macros
Macros are a special type of command prefixed with a colon. Instead of being interpreted as a JavaScript command, a macro is looked up in a dictionary, and the result is used as the “real” command. For instance, if you enter the command :listM (short for “list macros”), the macro dictionary is queried for the string “listM”, and (by default) the code for (let prop in macros) { ConsoleMessage('macro-list', ':' + prop) } is found and executed. This code is called the expansion of the macro. The result is a list of macros being printed:
:clr
:clear
:spawn
:bgColor
:showM
:rmFgColor
::
:d
:ds
:listM
:setM
:delM
:fgColor
:rmBgColor
:resetM
As you can see in the example, To see the expansion of a macro without executing it, use :showM:
> :showM :delM
:delM = deleteMacro(PARAM)
When a macro with the word PARAM is executed, PARAM is replaced with any text following the macro name, surrounded in quotation marks. This is how :showM functions, for example; the string “:showM :delM” is expanded to “showMacro(":delM")”, causing the JavaScript function showMacro(), which is part of the console script, to be called. You can see the implementation of showMacro() by entering showMacro – without any parentheses – into the console.
An initial set of macros is loaded from debugConfig.plist. If you edit any macros, using :setM or :delM, all macros are saved in Oolite’s preferences from that point forwards. This means that you don’t have to re-enter any macros you write with :setM after restarting Oolite.
The following example creates a simple :msg macro:
> :setM msg ConsoleMessage(' ',PARAM)
If you then type:
> :msg Hello World
The macro will be expanded, and you'll see “Hello World” on the console. However, macros are not functions, so you cannot use macros in the middle of javascript, or as part of another macro.
Console Properties
The console has several properties. They are accessible with "console.Foo":
debugFlags (r/w)
shaderMode (r/w)
maximumShaderMode (read only)
reducedDetailMode (r/w)
displayFPS (r/w)
platformDescription (read only)
pedanticMode (r/w)
ignoreDroppedPackets (r/w)
With debugFlags you can selective set/disable debugging options. Every debugging option is activated by setting a corresponding bit in the debugFlags:
Linked Lists                = 0x00000001
Collisions                  = 0x00000004
Docking                     = 0x00000008
Octrees - Verbose Logging   = 0x00000010
Bounding Boxes              = 0x00000040
Octrees - Draw              = 0x00000080
Normals                     = 0x00000100
Hide Dust		    = 0x00000200
disable Shader Fallback	    = 0x00000400
Extra Shader Validation	    = 0x00000800
Miscellaneous	            = 0x10000000
The console script
While an external or integrated console is required to provide a means of user interaction, most of the actual behaviour of the console is implemented in JavaScript, in a script called oolite-debug-console.js. Input typed into the console is passed to the console script, which then generates output. The console script is also informed of log messages and JavaScript errors, and provides a global function, ConsoleMessage(colorCode: String, message: String), to write messages to the console using its background colour support. Lastly, the console script implements the entire macro system.
This means that the console’s behaviour can be extensively customized, for instance, by replacing the macro system with something more powerful. There are two basic approaches to doing this:
- Creating a custom script (or a copy) with the same name, in an OXP which loads later than Debug.oxp (e.g., one which has a name which comes later in alphabetical order).
- Using a normal world script, and changing the console script object at startup.
The latter approach has the advantage that it can continue to work with future versions of the console script, and multiple patches can coexist. For example, a modification to supplement the macro system with a better one might look as follows:
this.name = "my-super-console-macros"

this.startUp = function()
{
    // Ensure debug console is installed
    if (!debugConsole)  return

    // Save original implementation of consolePerformJSCommand
    // Note the prefix, used to ensure uniqueness. If several scripts patch
    // the same method, it's important that they use different names.
    debugConsole.mySuperConsoleMacros_original_consolePerformJSCommand = debugConsole.consolePerformJSCommand

    // Replace debugConsole.consolePerformJSCommand with custom function
    debugConsole.consolePerformJSCommand = function(command)
    {
        // Note that in this function "this" will refer to debugconsole, not
        // my-super-console-macros, since the function will be called as a
        // method of debugConsole.

        // Strip leading spaces, same code as original function.
        while (command.charAt(0) == " ")
        {
            command = command.substring(1)
        }

        if (command.charAt(0) == "!")
        {
            // Super macro call detected.
            // Insert super macro system here.
        }
        else
        {
            // Otherwise, call through to original method.
            debugConsole.mySuperConsoleMacros_original_consolePerformJSCommand(command)
        }
    }
}
This same patching technique, incidentally, can be used to modify scripts at runtime, either from the console or from other scripts.
Links
- How do I? .... (on Debug Console) (2021) - change system, change ship...
- (WIP) new GUI for debug console (CAG 2020)
- Debug Console for Python and Windows (CAG 2020)
- Some Tips on using the Debug Console (2015)
- Handy tip for starting the Debug Console in Linux (2012)

