Difference between revisions of "CombatHUD"
m (Added link to BB thread) |
m (Added second image) |
||
| Line 12: | Line 12: | ||
The OXP contains four HUD options, depending on how many pylons your ship has, and whether a joystick is used. |
The OXP contains four HUD options, depending on how many pylons your ship has, and whether a joystick is used. |
||
The standard HUD will accomodate up to Ten pylons and the uber HUD will accomodate up to the maximum of Sixteen pylons. There are stick and no-stick options for both. |
The standard HUD will accomodate up to Ten pylons and the uber HUD will accomodate up to the maximum of Sixteen pylons. There are stick and no-stick options for both. |
||
| + | |||
| + | '''Standard HUD (Joystick version)''' |
||
[[Image:HUD_demo.jpg|center]] |
[[Image:HUD_demo.jpg|center]] |
||
| + | |||
| + | '''Uber HUD (Joystick version)''' |
||
| + | |||
| + | [[Image:HUD-demo2.jpg|center]] |
||
==Licence/Author== |
==Licence/Author== |
||
Revision as of 12:13, 5 January 2012
Combat HUD
Contents
Overview
Combat HUD OXP
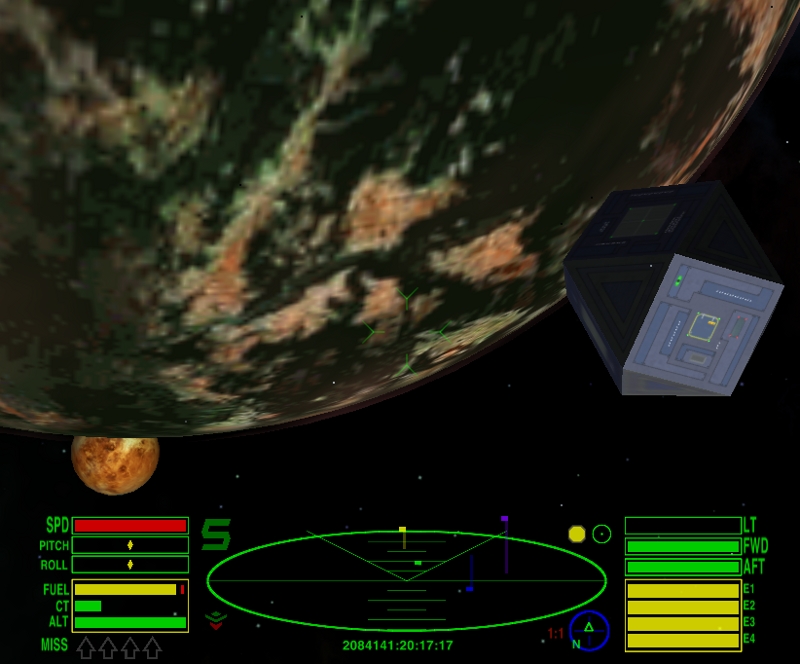
The Combat HUD has been optimised for combat situations. The vital information (Laser temperature, shields and Energy) has been grouped together on the right side to allow at-a-glance assessment during combat. The console messages are also here, above the gauges, and the status light and joystick sensitivity (where selected) also appear here.
On the left side of the main scanner are the speed, pitch and roll, fuel, cabin temperature and altimeter gauges. The aegis and scoop indicators are also here, and the comms messages will be displayed above these gauges.
If a scanner targeting enhancement is fitted the reticule will turn red when the target is centered. The OXP contains four HUD options, depending on how many pylons your ship has, and whether a joystick is used. The standard HUD will accomodate up to Ten pylons and the uber HUD will accomodate up to the maximum of Sixteen pylons. There are stick and no-stick options for both.
Standard HUD (Joystick version)
Uber HUD (Joystick version)
Licence/Author
This work is licensed under the Creative Commons Attribution-Noncommercial-Share Alike 3.0 Unported License. To view a copy of this license, visit http://creativecommons.org/licenses/by-nc-sa/3.0/ or send a letter to Creative Commons, 171 Second Street, Suite 300, San Francisco, California, 94105, USA.
OXP by Smivs
Installation
You will find two folders in the downloaded file, 'Combat-HUD.oxp' and 'HUDs'. To install the OXP open the 'HUDs' folder and decide which option is best for you, then open the folder for your chosen HUD. Inside you will find a file called hud.plist. Open 'Combat-HUD.oxp' in which you will find a folder called 'Config'. Copy and paste the chosen 'hud.plist' file into the Config folder of the 'Combat-HUD.oxp'. Place 'Combat-HUD.oxp' into your AddOns folder. When you start Oolite, hold down the 'shift' key untill you see the spining Cobra, and your HUD will be installed and working.
Version History
v1.0 Released 2012/01/04
Download
Download Combat HUD OXP here
Oolite Forum thread
Any questions, problems or bug reports should be posted on this OXP's BB thread here

